Sunday, September 21, 2008

Opening Night!


We debuted the theater last night to rave reviews from friends and family! There's still a long list of little details to do but it's operational. Now I can sit back, relax and watch some movies!

Friday, September 12, 2008

Projector Installed


The projectors up!!! (Sorry, I get so excited these days, it's been a long project!) It's a Panasonic PT-AX200U purchased from Costco.com. It's a 720p projector. Overall I'm pretty happy with the Panny's picture quality (especially for the price!). Standard def dvds look a little ragged projected on a 10 foot screen, but the HD satillite feed looks spectacular. I'll get into Blu-Ray at some point but for now it's great. Plus the color and contrast are very film like, which was an important thing for me. Too many projectors have what could best be descibed as a 'video look', great for watching Monday Night Football but not so good for movies.

I'll build a themed enclosure for the projector once I'm finished with a few other things.

The carpet is in!


Yesterday they installed the carpet. To quote The Dude (The Big Lebowski) "It really pulls the room together, man." With the carpet in the room sounds really sweet! The black panels on the lower part of the walls are acoustic insulation to aide in the surround balance. They'll get covered with fabric panels.

Thursday, September 11, 2008

Finishing the Projection Screen


It's time to get the screen up. The frame has been finished and sitting to the side for several weeks now. First I had to wrap the screen frame with black velvet. Velvet is used as it is the darkest, blackest material available. The projected image will be slightly larger than the white screen area and the black velvet will render this spill over virtually invisible.

Steel angle brackets where used to hold the corners together. The acoustically transparent screen material was stretched and fastened to be back of the frame with staples. The screen is actually a woven fabric roller shade material that an entrepreneurial fellow is buying from the manucfacturer by the 100 yard roll and selling off to DIYers like myself by the foot. Good on 'em I say. What am I gonna do with and extra 97 yards of the stuff!

Eventually there will be deep red curtains framing the screen.

Tuesday, September 9, 2008

Audio System Installed


Now that all the construction and painting is finished I can begin to install the audio and video components. Here are the front speakers. Those are Thiel CS2.4s for the front left and right, a Thiel MCS for the center and a Cerwin Vega subwoofer. The Sub's going to be visible below the screen so I'll have to build some sort of themed enclosure for it. The 3 front channel speakers have been elevated so that their tweaters are lined up across the center of the projection screen. One concession I had to make with placing the speakers behind the acoustically transparent screen is not being able to see them, and the Thiels are beautifully crafted. I had these made in a cherry veneer and the fit and finish of the enclosures is specatacular. Oh well.

The Patina of Age


My good buddies Gary and Mike came over yesterday and helped weather the theater. They're both professional scenic artists and did a great job adding a patina of age. It was mostly done with an umber colored glaze added here and there and then sprayed down with water to make it run. Occasional rust streaks were added as well.

Wednesday, September 3, 2008

Ceiling Beam Installation Finished


All the ceiling beams are up! Yeah! That was the last major construction item to be done. Now it's all just (a very long list of) little things to get done. The beams really help to make the room feel more closed in, more claustrophobic. Which is the right thing for a submarine!

I also got the beam bolt downs all put in. Like everything else, they're made out of medium density fiberboard, even the bolt heads. Originally I was going to make one bolt head as a pattern, mold it and cast up the 24 needed. But it turned out to be faster just to cut them out and sand them to shape on the belt sander. Only took a couple of hours to make them.

Sunday, August 31, 2008

Entry Door from Living Room


Here's the entry door from the living room. It opens out so guests will see the poster as they enter, setting the theme in their minds. There will be a riveted frame around the poster that isn't done yet. The poster is a reproduction of the Disneyland attraction poster from the late 50's. I drew it up in Adobe Illustrator and had it printed at a local sign shop.

Thursday, August 28, 2008

Ceiling Beam Installation Begins


The first set of ceiling beams was installed today! Yea, the end is in sight! Okay, you've got to have binoculars to see it but it's there. Good thing too, I'm getting dangerously close to burning out! Must... finish... theater...! With the installation of the first beams I was also able to solve a little engineering concern I've been having. The ceiling, which looks like any other drywalled ceiling, is actually suspended from rubber and steel acoustic dampeners which reduce the transfer of sound through to the attic and thus to other rooms. These dampeners have a weight limit they will reliably hold and the two layers of drywall in the ceiling come close to maxing out that limit. I've been concerned that hanging the beams from the ceiling could cause it to sag in time, or worse. Then a flash of inspiration! By joining the two haves of the beam together with a plate in the middle, the resulting unit would be rigid enough to span the room making it possible to attach it only at the side walls and not at all to the ceiling. The plates on the side walls to which the beams are anchored are already screwed into the studs so weight bearing should be not problem.

In the second picture you can see the MDF plate bolted in place bridging the joint between the two halves of the beam. There are actually two plates, one on each side, sandwiching the joint. The bolts will get covered with rivet heads and the plate painted to match the beams. There is also still to come a curved flange where the beams meets the duct. These have to be custom fit once each beam is in place.

Ceiling Beam Fabrication - Part 2


For the curved flange along the bottom of the beam I was faced with a bit of a challenge. One way of making the beam would hae been to laminate up a wide, flat curved piece from strips of 1/8 inch thick wood on a clamping pattern similar to how the curved projection screen frame was made. But this would have be too time consuming. There are eight beams and each curved flange would have had to be clamped up and left to set over night. Instead I decided to work in the other direction. I cut out curved strips using routing templates and the router table. Here are the parts for two beams. I made each flange side in two parts to make them easier the handle and get more efficient use of materials.

The flange strips were then sandwiched on either side of the beam center. The overall width of the flange was to be 3 inches, so minus the 3/4 inch center, each side strip needed to be 1 1/8 inches wide. To get the width I laminated together either 3/4", 1/4" & 1/8" or 1/2", 1/2" ans 1/8" scrap MDF. I've pretty much run out of the 1 inch thick material.

In the close up picture you can see the fillet of white spackle that's being added to all the inside corners to give the finished beam the appearance of a solid casting.

Friday, August 22, 2008

Ceiling Beam Fabrication - Part 1


I'm finally underway with the fabrication of the ceiling beams which are the last big construction item to be done before the carpet can go in. The process for making the parts for the beams was very simaler to that of the Iris Viewport. I had a full sized pattern printed out at my local blueprint service bureau. This was then spray glued down to a sheet of 1/4 inch MDF (medium density fiberboard) which was then cut out with a jig saw to make a routing template.

The template was temporarily tacked down to a sheet of 3/4" Ultralite MDF which was then trimmed to shape with a flush cutting router bit in the router table.
Once all t he parts were cut out the were slotted for the plate biscuits that will be used to reinforce the joints. Then the straight flanges were attached to the beams.

The next step is to cut out and attach the curved flange along the bottom edge of each beam.

Wednesday, August 20, 2008

Vent Fabrication


The ducts running along the ceiling are not only cosmetic, but functional as well. They house the real heating and air conditioning ducts for the theater, so the vents, or registers, for these ducts also had to be functional. They are based on vents in Arronaux and Ned's cabins modified to work with an off-the-shelf HVAC register.

The baseplates for the vents were cut from the same 24" diamter heavy cardboard tubes that I used for the ducts and the rectangular body built up from 3/4" MDF. Once assembled the center of the cardboard base was cut out to allow for air flow and cast resin rivet heads were glued in place.

The installed vents were fit with functional registers. Rivets were glued in place over the mounting screws in the corners. If you look closely you'll see that the screws used to mount the register are slotted, which is appropriate to the period. these turned out to be rather difficult to find as most hardware stores only carry the Phillips head type!

Friday, August 15, 2008

Projection Screen Fabrication - Part 2


Once the laminated parts cured I ripped them to a width of 3 1/2 inches on the table saw. The inside edges were beveled with a 45 degree router bit. The corners were mitered and slotted for plate biscuits that would help keep the joints aligned.

The ten-foot long curved frame members wound up having a little more flex than desired (maybe due to the Luann plywood) so I added curved ribs cut from 1x6 pine to the backsides. The piece on the left also has added blocks for the metal French cleat hangers.

The screen will be mounted on struts sticking straight out from the screen wall. this keeps the areas above and below the screen free from obstructions.

Once the I did a test assembly on the frame it became obvious that the mounting struts would have to be modified to be adjustable in order to allow the hanging cleats to be lined up straight and level.

Seating has Arrived


Too bad the theater's not ready yet! Oh well, no matter. In the mean time I've put three of the chairs into storage and set up the other three in the Family Room so we can use them while watching the Olympics.

The seats are from La-Z-Boy. I was really impressed with their build quality and comfort (we were able to try them out in the showroom rather than buy sight unseen (sit unsat?) from a website. The fabric is a polyester micro-fabric that has the look and feel of crushed velvet. Perfect in keeping with the Victorian Steam-Punk style of the Nautilus. And they're made here in the good ol' USA.

Thursday, August 14, 2008

Projection Screen Fabrication - Part 1


The theater will feature a curved, acoustically transparent projection screen. This will allow for all of the front speakers to be placed behind the screen, just like in a commercial cinema. The subtle curve of the screen will help correct the pin-cushion distortion inherent in anamorphic projection and also create a sharper focus from the center of the screen to the outer edges.

I've decided to build my curved screen out of wood for several reasons. The first was cost. Often 2-inch square aluminum tube is used for such a frame. The material cost for aluminum was rather high, plus there would be the additional cost of sending the tubing out to have it bent into the proper curve. Second, a wooden frame would allow both the black velvet and screen material to be secured with staples, rather than a more elaborate mechanical fastening system of some sort. Third, I liked the aesthetics of a wider, shallower frame member over the boxy 2 x 2 aluminum profile.

SeymourAV, from where I purchased the AT screen material, has a very good download of instructions on building a flat AT screen. I liked their basic methodology of the structural frame getting wrapped in black velvet and forming the masking border as well. I followed their instructions, just substituting curved members for the frame top and bottom.

The finished screen will measure 48 x 113 inches (122 inches diagonal), 2.37:1 aspect ratio, curved to a radius of 40 feet. The screen members would wind up being 1 inch thick by 3 1/2 inches wide and would be laminated together out of five layers of 1/4 inch thick Luann plywood. Like most plywood, Luann is slightly undersize in thickness; the five layers stacked up measured almost exactly one inch. Luann is an inexpensive imported mahogany plywood. In hindsight, it might have been better to use a better quality material (less flex) but at the time, the Luann was all I could find in a ten-foot long sheet.

The luann was cut into 4-inch wide strips on a table saw. Once laminated together, the pieces would then be cut down to the finished width of 3 1/2 inches.

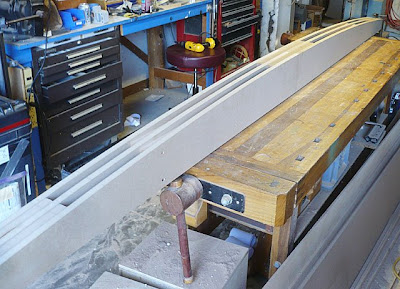
I built up a clamping form to the proper radius from MDF (Medium Density Fiberboard). The form was 10 feet, 2 inches long and just over 4 inches wide.

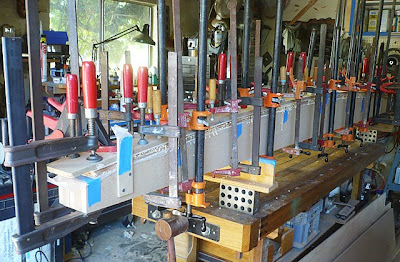
Each set of strips was coated in glue and clamped to the curved form. I used Titebond Extend glue which has a longer working time than regular woodworking glue, giving me enough time to get all the pieces clamped together before the glue starts to skin over. The form was covered with waxed paper to prevent the striped from getting glued to it. The clamped assembly was then left to set overnight.

The last photo shows the untrimmed laminated frame members. The straight sides were just glued up clamped to a flat piece of wood.

Door Casings Complete


The door casings are now complete with rivets and half-round moulding. I was able to find 1 1/2" half-round wood moulding for the sides and top of the frame but for the corners I had to make a custom curved part, mold and multiple castings.

The door on the left is still to get rivets and textured paint.

Stage Finished


The stage is complete and painted. The area of the stage that is painted black will be hidden behind the screen and curtains.